


Crawl space encapsulation is a valuable solution for homeowners seeking to control moisture, improve air quality, and boost energy efficiency. However, many myths surround the process, leading to confusion and hesitation. Understanding the facts is essential for making an informed decision. When properly installed, crawl space encapsulation offers long-term benefits that go beyond mere moisture control. It can protect your home from structural damage, save energy, and create a healthier living environment.
This article will debunk common misconceptions about crawl space encapsulation, provide factual comparisons, and offer insights that help homeowners make informed choices.
Why Crawl Space Encapsulation Is Important
A crawl space without proper encapsulation is prone to moisture buildup, which can lead to a variety of issues. Moisture can cause mold growth, wood rot, and attract pests, such as termites or rodents. These problems can weaken the structure of your home, degrade indoor air quality, and even affect the health of your family members.
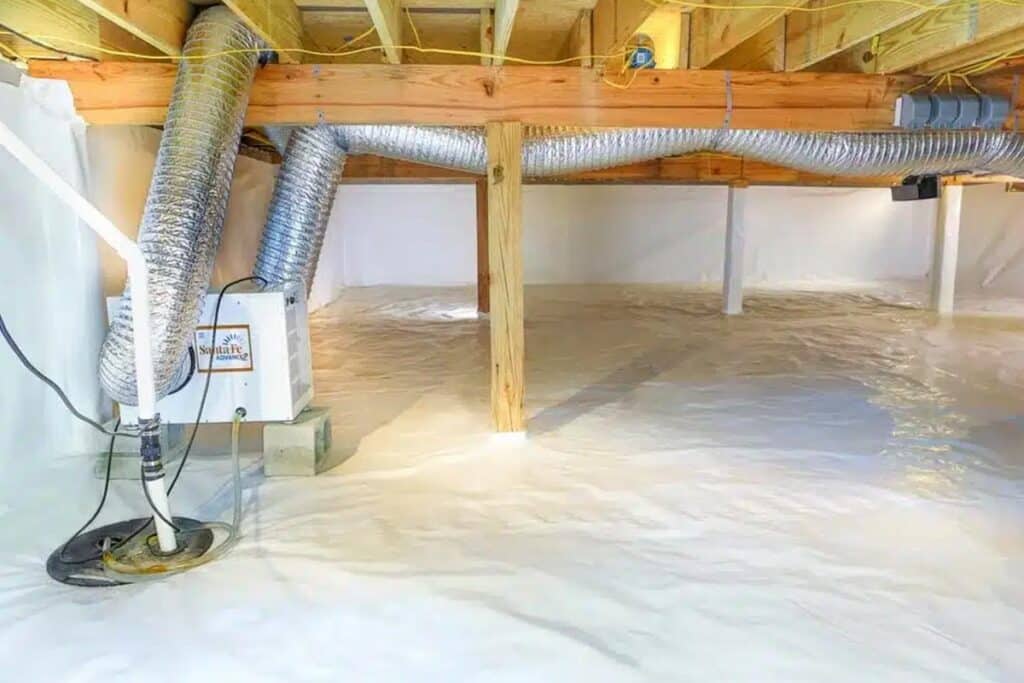
Encapsulation works by sealing the crawl space with a durable vapor barrier and often includes additional elements such as insulation, ventilation management, and dehumidification systems. Proper encapsulation ensures a dry, stable environment that protects the foundation, prevents pests, and improves energy efficiency. In fact, the U.S. Department of Energy suggests that encapsulating your crawl space can reduce energy costs by up to 20%, a significant saving over time.

Common Myths About Crawl Space Encapsulation
Myth 1: Encapsulation Is Only Necessary for Homes with Moisture Problems
One of the most common misconceptions is that crawl space encapsulation is only needed if there is visible moisture or water damage. While it’s true that excessive moisture is a clear indicator of a problem, encapsulation isn’t just a reactive solution. Even homes with seemingly dry crawl spaces can benefit from encapsulation as a preventive measure.
Over time, hidden moisture can accumulate due to changes in weather, leaks, or condensation, leading to mold, mildew, and wood rot. Encapsulating your crawl space prevents these issues from developing in the first place. It’s an investment in the future that saves you from costly repairs down the line.
Bonus Tip: Use a hygrometer to monitor the humidity levels in your crawl space. If they consistently exceed 60%, encapsulation might be a good option even if you don't see visible moisture.
Myth 2: Encapsulation Traps Moisture Inside
Another myth is that crawl space encapsulation traps moisture inside the space, creating a “sealed” environment that worsens mold growth. This misunderstanding stems from a lack of knowledge about how encapsulation systems work.
Proper encapsulation doesn't trap moisture; it actively blocks external moisture from entering while ensuring proper ventilation or dehumidification. When done correctly, a vapor barrier prevents moisture from the ground and surrounding environment from seeping in, which keeps the crawl space dry. Furthermore, many encapsulation systems include dehumidifiers or ventilation systems to regulate moisture levels and prevent excess humidity buildup.
Myth 3: Plastic Sheeting Alone Is Enough for Encapsulation
Many homeowners think that simply laying down plastic sheeting over the ground in the crawl space is sufficient. However, true encapsulation goes beyond this. It requires sealing vents, insulating walls, and, in many cases, installing mechanical systems like dehumidifiers or sump pumps.
Encapsulation systems involve a combination of multiple steps. The vapor barrier is laid on the floor and walls, and the entire space is sealed to prevent air and moisture from entering. This thorough approach ensures that the crawl space remains dry and well-regulated, which a simple sheet of plastic cannot achieve.
Bonus Tip: Always choose a high-quality vapor barrier (12-mil polyethylene or thicker) to ensure durability and effectiveness in blocking moisture.
Myth 4: Encapsulation Increases Energy Bills
There’s a belief that sealing a crawl space can lead to higher energy bills because it might trap heat inside the space. The truth is that encapsulation can actually reduce energy costs. By sealing the crawl space and regulating the temperature, you prevent the cold, damp air from entering your home, reducing the workload on your HVAC system.
Proper encapsulation maintains a more consistent temperature throughout your home, which makes it easier and more cost-effective to heat and cool. As a result, you’re likely to see a reduction in your heating and cooling bills.
Market Fact: According to Energy Star, homeowners can save 10-20% on their annual heating and cooling costs by sealing and insulating areas like the crawl space.
Myth 5: Crawl Space Encapsulation Is a DIY Project
While DIY enthusiasts may attempt to encapsulate their crawl space, it’s often a job best left to professionals. Inadequately installed systems can lead to more problems than solutions. Professional encapsulation ensures that all components are correctly installed, including the vapor barrier, insulation, and ventilation systems.
A certified contractor will assess your crawl space’s specific needs, properly install the system, and provide ongoing maintenance advice. Professional installation can save you money in the long run by preventing costly mistakes and ensuring the job is done right.

Components of a Proper Crawl Space Encapsulation
Encapsulation systems consist of several critical components that work together to keep the crawl space dry and stable. Below is a breakdown of these components and their purpose:
Component
Purpose
Importance Level
Vapor Barrier
Blocks ground moisture and vapor
Critical
Wall Insulation
Regulates temperature and improves energy efficiency
High
Sealed Vents
Prevents outside air intrusion and moisture
Critical
Dehumidifier (if needed)
Reduces humidity levels in the crawl space
High
Sump Pump (optional)
Manages standing water and prevents flooding
Situational
Technical Specifications for Crawl Space Materials
Different materials are used to ensure a durable and effective encapsulation. Here’s a look at the most common specifications for these materials:
Specification
Details
Vapor Barrier Thickness
Minimum 12-mil polyethylene
Wall Insulation R-Value
R-10 or higher recommended
Sealing Material
Butyl tape, polyurethane caulk
Dehumidifier Capacity
Sized for crawl space cubic footage
Sump Pump Flow Rate
2,000–3,500 gallons per hour (GPH)
Things to Consider Before Making a Decision
Before proceeding with crawl space encapsulation, several factors need to be considered to ensure the decision aligns with your home's needs and your long-term goals:
- Current Moisture Levels: Measure humidity and check for signs of moisture, such as water stains or mold, in the crawl space.
- Foundation Type: Encapsulation methods can vary depending on whether the foundation is a pier-and-beam or slab-on-grade.
- Climate Zone: Homes in regions with high humidity or heavy rainfall may require additional drainage or dehumidification systems.
- Budget: The upfront cost of encapsulation can vary, so it’s essential to weigh the initial investment against the long-term benefits like energy savings and protection from structural damage.
- Professional Installation: Ensure the contractor has experience with encapsulation and uses quality materials to achieve lasting results.
Bonus Tip: Always ask for a moisture analysis report before approving work to understand the specific needs of your crawl space.
Make the Right Decision
Crawl space encapsulation is a wise investment for homeowners looking to protect their homes from moisture damage, improve energy efficiency, and create a healthier living environment. By debunking common myths, it becomes clear that encapsulation isn’t just a fix for existing problems—it's a preventive measure that can save money and prevent costly repairs. Before making a decision, carefully assess your crawl space’s condition, local climate, and your long-term goals. By selecting the right encapsulation system for your needs, you'll ensure the longevity and health of your home.
Common Questions About Crawl Space Encapsulation
Does every crawl space need a dehumidifier after encapsulation?
Not every crawl space requires a dehumidifier, but homes in high-humidity areas or regions with frequent rainfall benefit from this addition. A dehumidifier helps keep humidity levels low and prevents mold growth.
How long does crawl space encapsulation last?
When installed correctly, an encapsulation system can last for 20-25 years with minimal maintenance. The vapor barrier may need occasional repair, but the system should remain effective for decades.
Can encapsulation affect indoor air quality?
Yes, encapsulation can improve indoor air quality by preventing the growth of mold and controlling moisture levels in the crawl space. This, in turn, reduces the spread of allergens and harmful airborne particles.
Is it necessary to insulate the crawl space walls?
In most cases, insulating the walls helps regulate the temperature of the crawl space and the home above. Proper insulation can also enhance the overall energy efficiency of the building.
What is the best vapor barrier thickness for encapsulation?
A 12-mil or thicker vapor barrier is recommended for long-term durability and moisture resistance. Thicker barriers provide better protection and are more resistant to wear and tear.
Comments