


Introduction
A good patch depends on a clear workflow. Many people in the United States who work as a patch maker follow a steady process that helps them produce clean lines, strong backing, and long lasting color. This guide explains each step in a simple way. It can help hobby users, small shop owners, and anyone who wants to understand how patches move from an idea to a finished piece.
The goal is to show a smooth path that leads to better results without pushing any product or service.
Planning The Patch
Before a patch reaches a machine, the idea behind it must be set. Planning helps reduce mistakes and gives structure to the full process.
Key points during planning
- Decide patch size
- Pick shape and outline
- Think about thread type
- Note any small details that may need extra time
Why planning helps
- Saves time in later steps
- Supports cleaner stitching
- Gives a clear guide for color work
Setting Up Artwork
A patch maker in the United States often begins with artwork preparation. This part is about turning ideas into a format that machines can read.
Artwork steps
- Draw or upload a clean design
- Check lines and spacing
- Set color areas
- Match thread tones as close as possible
Tips for better artwork
- Keep lines simple when possible
- Leave enough room for stitching
- Avoid tiny letters that may blend during embroidery
Turning Artwork Into Stitch Data
Once artwork is ready, the design moves to a stitch file. This file guides the machine needle.
What makes a good stitch file
- Smooth paths
- Balanced stitch counts
- Clean transitions between colors
Benefits of careful stitch planning
- Strong patch body
- Fewer thread breaks
- Cleaner surface
Preparing Materials
Good material choice supports the finished patch. Patch makers across the country often use fabric, backing, and thread that match the design style.
Common materials
- Twill fabric
- Felt
- Polyester thread
- Cotton thread
Backing types
- Standard sew on backing
- Hook and loop backing
- Iron on backing
Machine Setup
Patch makers set their machines based on patch style. Each machine needs the right frame size, needle type, and thread tension.
Steps in machine setup
- Frame the base fabric
- Load the stitch file
- Test small sections
- Adjust thread tension
Why setup matters
- Supports strong stitching
- Helps avoid loose threads
- Gives steady color flow
Embroidery Process
This is when the patch takes shape. The machine follows the stitch file and builds the design layer by layer.
Common embroidery stages
- Underlay stitch
- Fill stitching
- Border stitching
Tips for clean embroidery
- Keep fabric tight during stitching
- Check thread breaks fast
- Watch for color jumps
Cutting And Shaping
After stitching is done, patches move to cutting. Cutting defines the final shape and clears all extra fabric.
Cutting methods
- Heat cutting
- Laser cutting
- Hand trimming
Why cutting skill matters
- Helps keep borders smooth
- Gives patches a neat finish
Quality Check
A strong patch is the result of careful checking. Patch makers in the United States usually follow a steady inspection routine.
What to look for
- Even stitching
- Clean edges
- Strong backing
- Smooth color flow
Simple steps during checks
- Brush off loose threads
- Look for gaps in stitching
- Test patch flexibility
Patch Care Tips For Users
Once a patch is done, simple care keeps it looking new.
Care list
- Wash gently if needed
- Keep away from very sharp objects
- Store flat to avoid bends
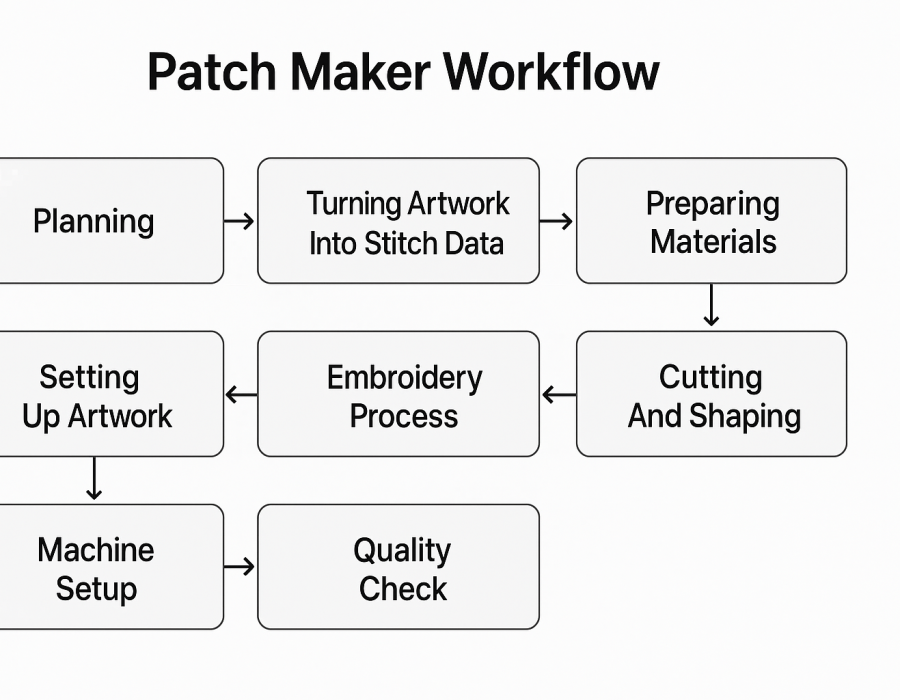
Table: Patch Maker Workflow Summary
StepPurposeKey FocusPlanningSet design ideaSize, outline, color notesArtworkPrepare designClear lines, simple layoutStitch FileGuide machineSmooth paths, balanced countsMaterialsBuild baseStrong fabric, right backingMachine SetupReady to stitchTension, needles, frameEmbroideryCreate patchClean fills, neat bordersCuttingShape patchSmooth edgesQuality CheckFinal reviewEven stitching, strong hold
Conclusion
A steady workflow helps any patch maker produce better results. By planning the idea, preparing artwork, setting up machines carefully, and checking each piece, the path to stronger and cleaner patches becomes simple. These steps guide anyone who wants to follow the same process used across many workshops in the United States. With patience and practice, each patch can reach a higher level of quality and stay strong for a long time.
Comments