


Lighting has come a long way from basic bulbs and glaring fluorescent tubes. Today, homeowners, designers, and DIY enthusiasts want lighting solutions that are not only functional but also stylish, energy-efficient, and versatile. One of the most exciting innovations in recent years is the COB strip light — a game-changer that’s transforming the future of LED lighting.
In this beginner’s guide, we’ll explore what makes COB strip light lighting so special, how it works, and how you can use it in your home. We’ll also show you how pairing it with corner profile lights can take your lighting design to the next level.
1. What Are COB Strip Lights? — Understanding the Basics
To begin, let’s break down what a COB strip light is.
COB stands for Chip On Board, a type of LED technology where multiple LED chips are packed tightly together on a circuit board. Unlike traditional LED strip lights that have individual visible diodes, COB strips create a continuous, dot-free line of light. This means the glow is smooth and uniform — no more distracting dots or gaps.
Because of this unique design, COB strip lights deliver several advantages:
- Flawless illumination without visible LED points
- Higher brightness and better heat dissipation
- Flexible design, allowing you to bend or cut the strip to fit tight spaces
- Energy efficiency, consuming less power compared to older LED strips
As you can see, COB technology is not just a small upgrade — it’s a major leap forward in the world of LED lighting.
2. Why Go Dot-Free? — The Big Benefits of COB Strip Light Lighting
Now that you know the basics, let’s dive into why dot-free lighting matters.
In traditional LED strips, the light comes from individual diodes spaced apart, creating a dotted effect on walls or ceilings. This can be distracting, especially in spaces where you want a clean and polished look.
COB strip lights solve this problem beautifully. Thanks to their compact design, they emit a seamless flow of light. This makes them ideal for:
- Cove lighting and ceilings
- Under-cabinet lighting in kitchens
- Mirror backlighting in bathrooms
- Accent lighting in living rooms and bedrooms
Additionally, when used inside a corner profile light, COB strips create a sophisticated and professional finish that’s hard to achieve with regular LEDs.
Not only do they look better, but COB strip lights are also:
- More durable due to better heat management
- More energy-efficient, saving you money on electricity
- Easier to install, with flexible, cuttable strips that fit almost anywhere
With so many advantages, it’s no wonder COB strip light lighting is quickly becoming the go-to choice for designers and homeowners alike.
3. Where Can You Use COB Strip Lights? — Top Applications for Every Room
Transitioning from old-fashioned lighting to COB strip lights opens up endless possibilities. Here are some of the best places to use them:
Living Room & Bedrooms
Use COB strip lights behind the TV, along the ceiling cove, or underneath furniture to create a cozy and inviting atmosphere. You can install them inside a corner profile light to highlight architectural details or frame a feature wall.
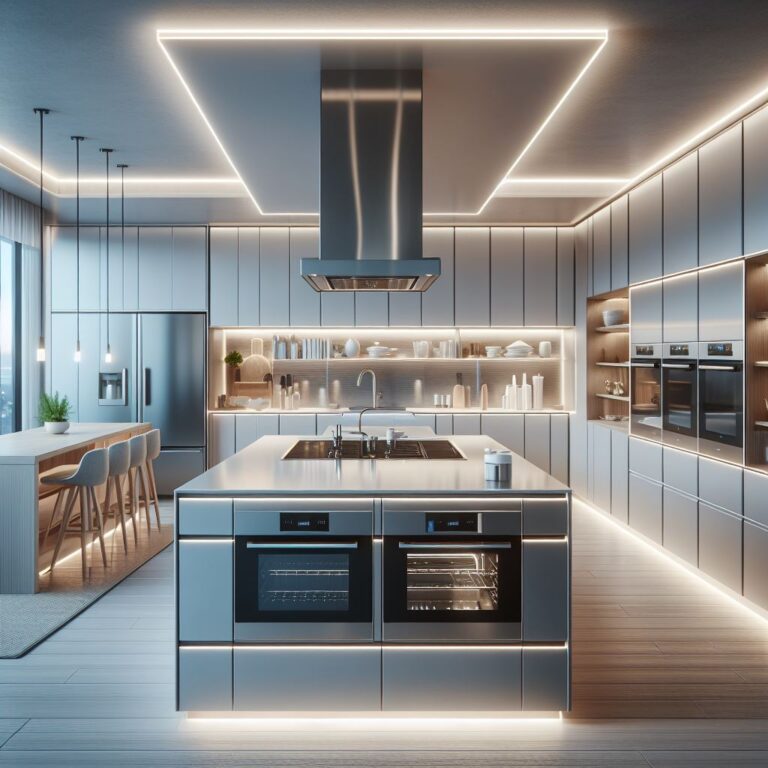
Kitchens
Add COB strip lighting under cabinets, inside drawers, or along the toe-kick of your kitchen island. The smooth, uniform glow eliminates shadows, making tasks like chopping and cooking much easier.
Bathrooms
Place COB strip lights behind mirrors or under floating vanities for a spa-like feel. Since they produce consistent light, they’re perfect for tasks like applying makeup or shaving.
Hallways and Staircases
Guide your way safely with COB strips along stair treads or in corner profiles on hallway walls. This adds both functionality and a touch of modern style.
Outdoor Areas
Many COB strip lights come in waterproof versions, making them perfect for patios, decks, or even garden paths. Just be sure to choose outdoor-rated products for safety and durability.
4. Combining COB Strip Lights with Corner Profile Lights — A Designer’s Secret Weapon
One of the best ways to elevate your lighting design is by combining COB strip lights with corner profile lights.
A corner profile light is an aluminum or plastic channel designed to hold LED strips neatly in place, especially in corners or along edges. Not only does it provide a clean, finished look, but it also improves heat dissipation and protects the strip from dust or damage.
When you insert a COB strip into a corner profile:
- You get a seamless line of light that looks luxurious and intentional
- The corner profile acts as a diffuser, softening the glow even further
- The design becomes sleek, modern, and professional-looking
This combination is perfect for:
- Highlighting staircases or architectural corners
- Framing mirrors or wall panels
- Adding accent lighting under shelves, cabinets, or bed frames
If you want to give your space a polished upgrade, this is one of the easiest and most effective techniques to try.
5. Choosing the Right COB Strip Light — Tips for Beginners
Choosing the right COB strip light lighting for your project can feel overwhelming at first, but it’s simpler than you think. Here’s what to keep in mind:
- Color Temperature:
- Decide whether you want a warm, cozy light (2700K–3000K), a neutral white (4000K), or a cool, modern look (5000K–6000K).
- Brightness Level:
- Consider how much light you need. For mood lighting, a lower brightness (300–600 lumens per meter) works well. For task lighting, go brighter (700–1000 lumens per meter).
- Dimmable Options:
- Look for dimmable COB strip lights if you want to adjust the mood in your space.
- Length and Flexibility:
- Measure your space carefully. Most COB strips come in rolls of 5 meters, but they’re easy to cut and shape.
- Waterproof Rating:
- For outdoor use or wet areas like bathrooms, make sure to choose waterproof (IP65 or higher) COB strips.
And don’t forget to pair your strips with a corner profile light if you want the neatest, most professional installation.
6. How to Install COB Strip Lights — A Step-by-Step Guide
Installing COB strip lights is a great DIY project, even for beginners. Here’s a simple step-by-step:
- Plan your layout:
- Decide where you want the lights and measure the area carefully.
- Prepare the surface:
- Clean the surface to ensure the adhesive sticks properly.
- Cut the strip:
- If needed, cut the COB strip to the correct length using the marked cutting points.
- Attach to a profile (optional):
- Place the strip inside a corner profile light if you want extra protection and a sleek look.
- Connect to the power supply:
- Use the provided connectors to link the strip to your power adapter. Make sure the power is off during this step.
- Stick the strip in place:
- Peel off the adhesive backing and press the strip firmly onto the surface.
- Turn on and enjoy:
- Switch on the power, and admire your beautiful, dot-free lighting!
Final Thoughts: The Future of LED Lighting Is Here
COB strip lights are more than just another lighting product — they represent the future of home and commercial lighting. With their dot-free magic, incredible flexibility, and energy efficiency, they open up endless design possibilities for both beginners and professionals.
By pairing COB strip lights with corner profile lights, you can achieve a polished, luxurious look that transforms any room in your home. Whether you’re upgrading a kitchen, cozying up a bedroom, or making a bold statement in your living room, COB strip light lighting offers a simple yet powerful way to elevate your space.
So, if you’re ready to leave old, dotted LED strips behind, it’s time to embrace the smooth, seamless glow of COB strip lights. Happy lighting!
Comments